
Using Auto-Caption for Educational Video
In the digital age, educational content has transcended traditional boundaries, finding its place on social media platforms, online courses, and multimedia presentations. As educators seek to make their content more accessible and engaging, features like auto-captioning have become invaluable tools for enhancing the learning experience.
CapCut offers a seamless solution for adding captions to educational videos. In this article, we’ll explore how educators can leverage CapCut’s auto-captioning feature to create compelling and inclusive educational content.
Why Captioning Matters in Education
Captions are written renditions of spoken words found in multimedia materials. They offer accessibility to web-based audio and video content for individuals lacking audio capabilities. Captions help students with comprehension, accuracy, engagement, and the retention of information transmitted in course videos. While primarily designed for the hearing impaired, captioning also benefits those with auditory processing challenges and individuals unfamiliar with the audio’s language.
How to Add Auto-Captions in CapCut
Now, let’s explore how educators can leverage CapCut’s auto-captioning feature to enhance their educational videos:
1. Prepare Your Video
Begin by recording or selecting the educational video you wish to edit. Whether it’s a lecture, tutorial, or instructional demonstration, ensure that the audio is clear and well-articulated for accurate transcription.
2. Import Your Video into CapCut
Launch the CapCut app and import your video into the editing interface. CapCut supports various video formats, allowing you to seamlessly integrate your educational content into the editing workflow.

3. Enable Auto-Captioning
Locate the captioning tool within the editing interface, go to Text > Auto caption > Select Language. Capcut will automatically generate caption for you.

4. Review and Edit Captions
Once the auto-captioning process is complete, review the generated captions for accuracy. While CapCut’s algorithms strive for precision, occasional errors may occur, particularly with technical terminology or accents. Double click
on text that needs correction.
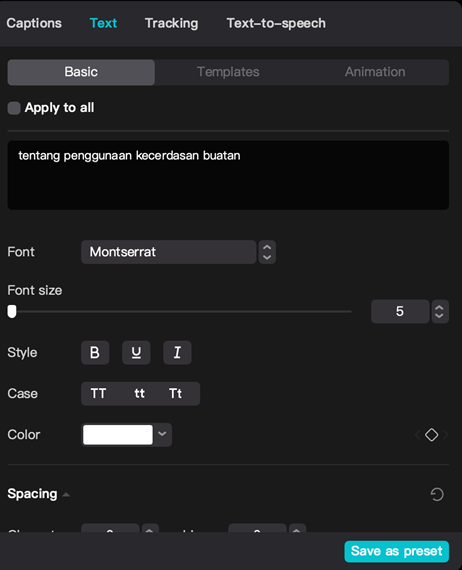
5. Customize Captions
Personalize your captions to enhance readability and engagement. Adjust the font style, size, color, and position to complement your video’s aesthetic and optimize accessibility. Experiment with caption animations and timing adjustments
to synchronize text with the pace of your educational content.
6. Preview and Finalize
Preview the video with captions enabled to simulate the viewing experience for your students. Ensure that the captions are synchronized with the audio and enhance comprehension without distracting from the content. Once satisfied,
export your edited video with auto-generated captions included. Export Button is located at the top right corner.
Conclusion
Incorporating captions into educational videos is a powerful way to enhance accessibility, engagement, and learning outcomes. With CapCut’s auto-captioning feature, educators can create compelling and inclusive educational content that resonates with diverse learners. By following the steps outlined in this article, educators can harness the full potential of auto-captioning to empower education and foster an inclusive learning environment for all students.
A Rising Tide: How Closed Captions Can Benefit All Students. (n.d.). EDUCAUSE Review. https://er.educause.edu/articles/2017/8/a-rising-tide-how-closed-captions-can-benefit-all-students
Add Subtitles to Video Free | Restyle Your Video – CapCut. (n.d.). https://www.capcut.com/tools/add-subtitles-to-video